IdeaVaultHQ Template School
How To Build an Etsy Search Visibility Tracker in Google Sheets for Canva Templates
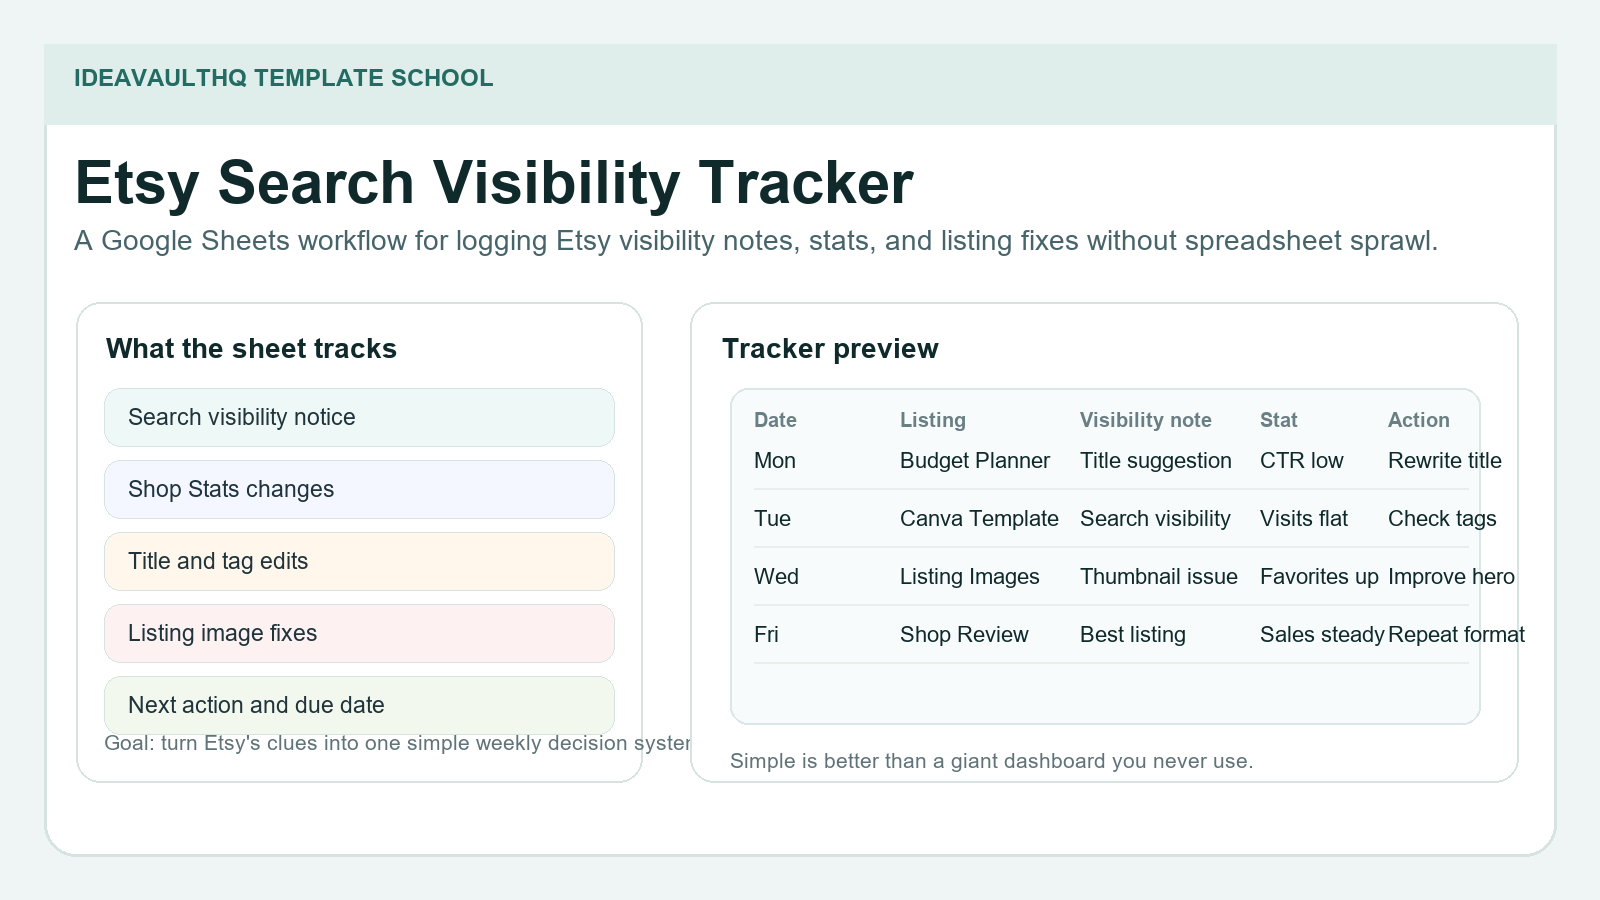
This tutorial turns Etsy’s visibility clues into a simple Google Sheets tracking system. You will log what Etsy says about a listing, what the stats show, and which single fix you made next. The point is not to build a giant dashboard. The point is to build a beginner-friendly decision tool that helps you stop guessing.
Quick answer: If your Etsy listings are getting clicks, favorites, or search visibility notes but not the results you want, build one sheet that records the signal, the metric, the problem, and the next action. That gives you one place to compare before and after instead of trying to remember what changed.
Workflow Summary
Step 1: Understand Why Search Visibility Is Worth Tracking
A lot of Etsy sellers feel the same thing: they make a listing change, wait, and then hope the result is obvious. It usually is not. The search visibility page, the Stats tab, and the listing edit screen each show a piece of the picture, but the pieces are spread across different places. That is why a tracker helps. It gives you one place to store what happened, when it happened, and what you tried next.
The current demand signal is easy to see in public seller discussions. People keep asking why traffic is low, why listings still feel invisible after edits, and whether a notice about search visibility means they need to change a title or image. That is not formal market research, but it is a clear sign that beginners need a simple way to think through the feedback Etsy gives them. A spreadsheet is a good fit because it slows the problem down enough to see patterns.
This tutorial is for Etsy sellers who make digital products, Canva templates, planners, and other simple downloads. Those listings often depend on search terms and clarity more than on physical product photos. If you sell templates, you need to know which titles, tags, or first images are helping or hurting. The tracker will not magically fix the shop, but it will keep the shop from becoming a guessing game.
Step 2: Read Etsy’s Official Guidance Before You Build Anything
Etsy’s Search Visibility page is the first official place to look. Etsy says that the page shows how listings are performing across areas like the shop, the listing, and customer service quality. Etsy also says the insights disappear after changes are made, which is useful because it tells you the system is meant to drive action, not just passive reading. The lesson here is simple: do not just check the page once. Record what it says so you can compare later.
Etsy Stats gives you the next layer. Etsy says Stats shows how your shop is performing, where traffic comes from, and how shoppers engage with listings. That means visits, traffic source, favorites, orders, and conversion matter. In practice, you do not need every metric in the shop. You need a few metrics that help you answer one question: did the change improve anything?
If you want the tracker to stay beginner-friendly, only use official data that Etsy already exposes. Do not invent a dozen complicated fields. Start with the date, listing title, visibility note, visits, favorites, orders, conversion rate, and the one action you took. When you know the basics, you can add more columns later. The sheet should help you think, not trap you in spreadsheet work.
Step 3: Build The Workbook Structure In Google Sheets
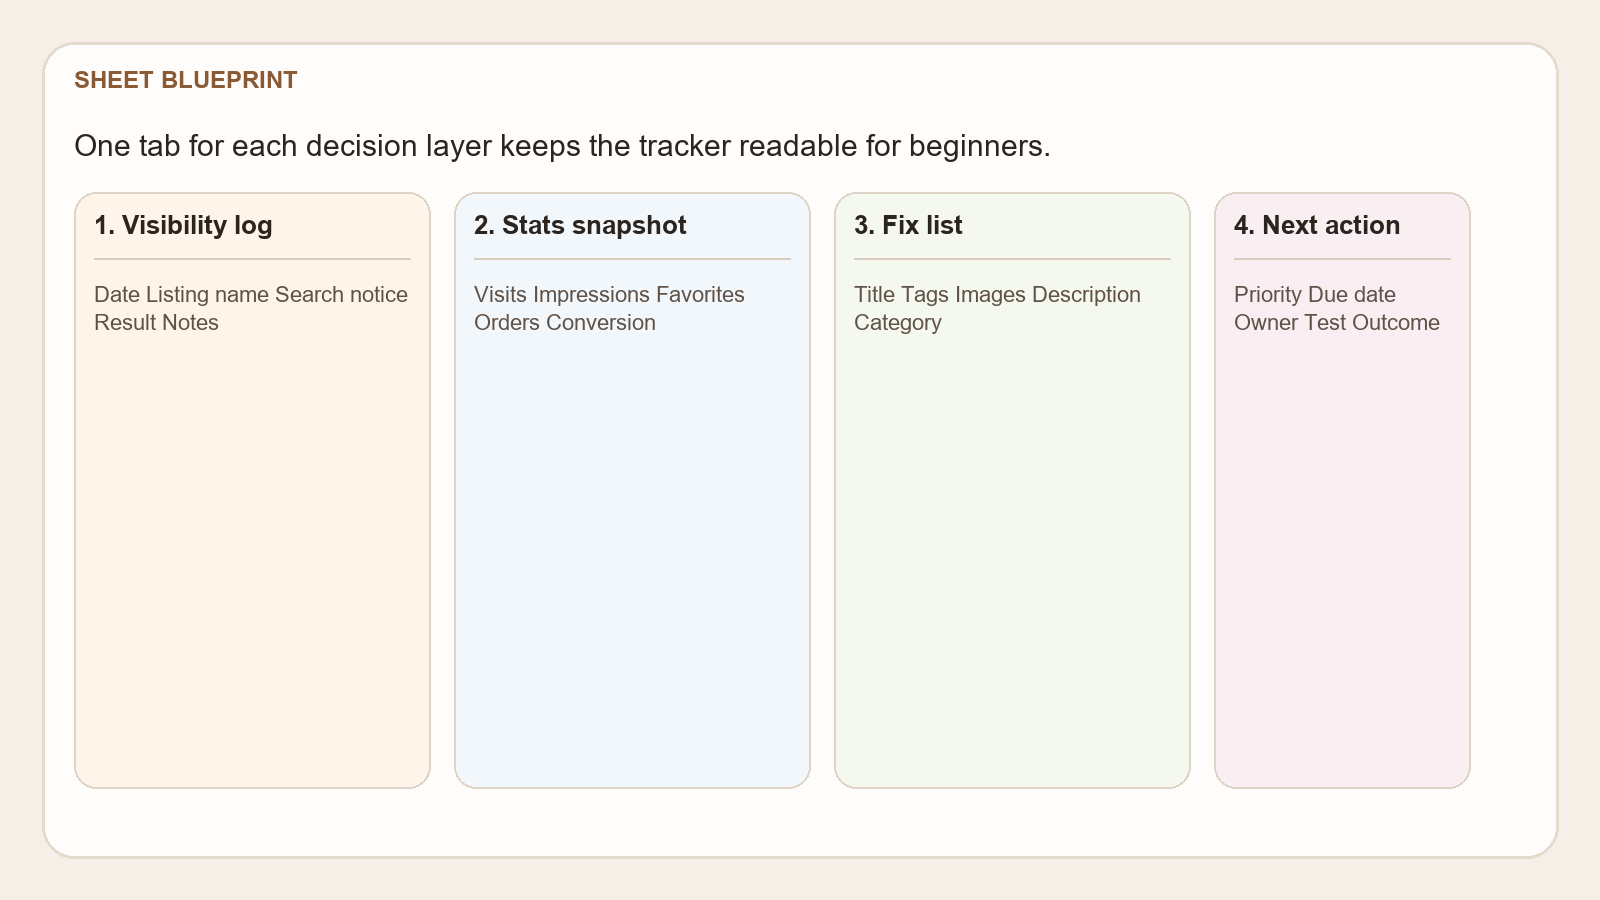
Open Google Sheets and create one workbook called Etsy Visibility Tracker. Then make four tabs: Visibility Log, Stats Snapshot, Fix List, and Notes. That is enough for version one. Beginners often build too many tabs because they want the tracker to feel impressive. Do the opposite. Make a workbook that is so simple you can keep using it after the first week.
The Visibility Log is where you record what Etsy told you. The Stats Snapshot is where you record numbers from the shop. The Fix List is where you write the one change you plan to make. The Notes tab is where you capture anything awkward or surprising, such as a title suggestion, a traffic source, or a buyer question that showed up in messages. Each tab has one job. That keeps the sheet from becoming a junk drawer.
Format the sheet so the top row stays visible. Use clear column names. Keep the first version plain. You do not need heavy styling, merged cells, or complicated formulas. A small, readable file is more likely to survive real use because it will not take long to open and update. If you use color, use it sparingly: one color for the header, one color for actions, and maybe one muted color for the status column.
Step 4: Set Up The Visibility Log Columns
On the Visibility Log tab, add these columns: date, listing name, visibility note, source of note, problem type, and next action. If Etsy shows a search visibility recommendation, write it down exactly enough that you can compare it later. If the problem is title clarity, say that. If the issue is image explanation, say that. Do not write vague notes like “needs work.” The whole point is to turn vague feedback into a usable record.
The source column matters more than beginners think. A note from the Search Visibility page is different from a note in Stats and different again from a Reddit comment or customer message. You do not need to pretend they are the same. Separating the source keeps your decisions honest. If the advice came from Etsy, give it more weight. If it came from public discussion, treat it as a clue, not a rule.
The next action column should only allow one action per row. If the title is unclear, write “rewrite title.” If the first image does not explain the product, write “improve hero image.” If the tags look too broad, write “tighten tags.” The tracker gets more useful when every row ends with a single verb. That makes the sheet feel like a working board instead of a diary.
Step 5: Add A Stats Snapshot Tab That You Can Fill In Fast
The Stats Snapshot tab should be simple enough to fill out in under two minutes. Use the columns that Etsy already makes easy to see: date, listing name, visits, favorites, orders, conversion rate, and traffic source if you want it. You can also add impressions or clicks if they are available to you in the places you already check. The goal is comparison, not perfection. One clean snapshot each week is enough to start.
When a listing gets a change, note the exact date. Then create a second snapshot after the change has had time to settle. Do not try to draw a conclusion from one afternoon. Digital listings can move slowly. You want a before-and-after rhythm, not a frantic live dashboard. The sheet should encourage that rhythm by making each snapshot obvious and dated.
For Canva templates and digital downloads, it helps to add a notes column that says what product angle the listing uses. That way you can compare a “planner for beginners” listing against a “template for Etsy sellers” listing without mixing them together. If both listings are in the same shop, the tracker helps you understand which angle is getting traction instead of guessing based on memory.
Step 6: Turn Etsy Signals Into One Decision, Not Ten
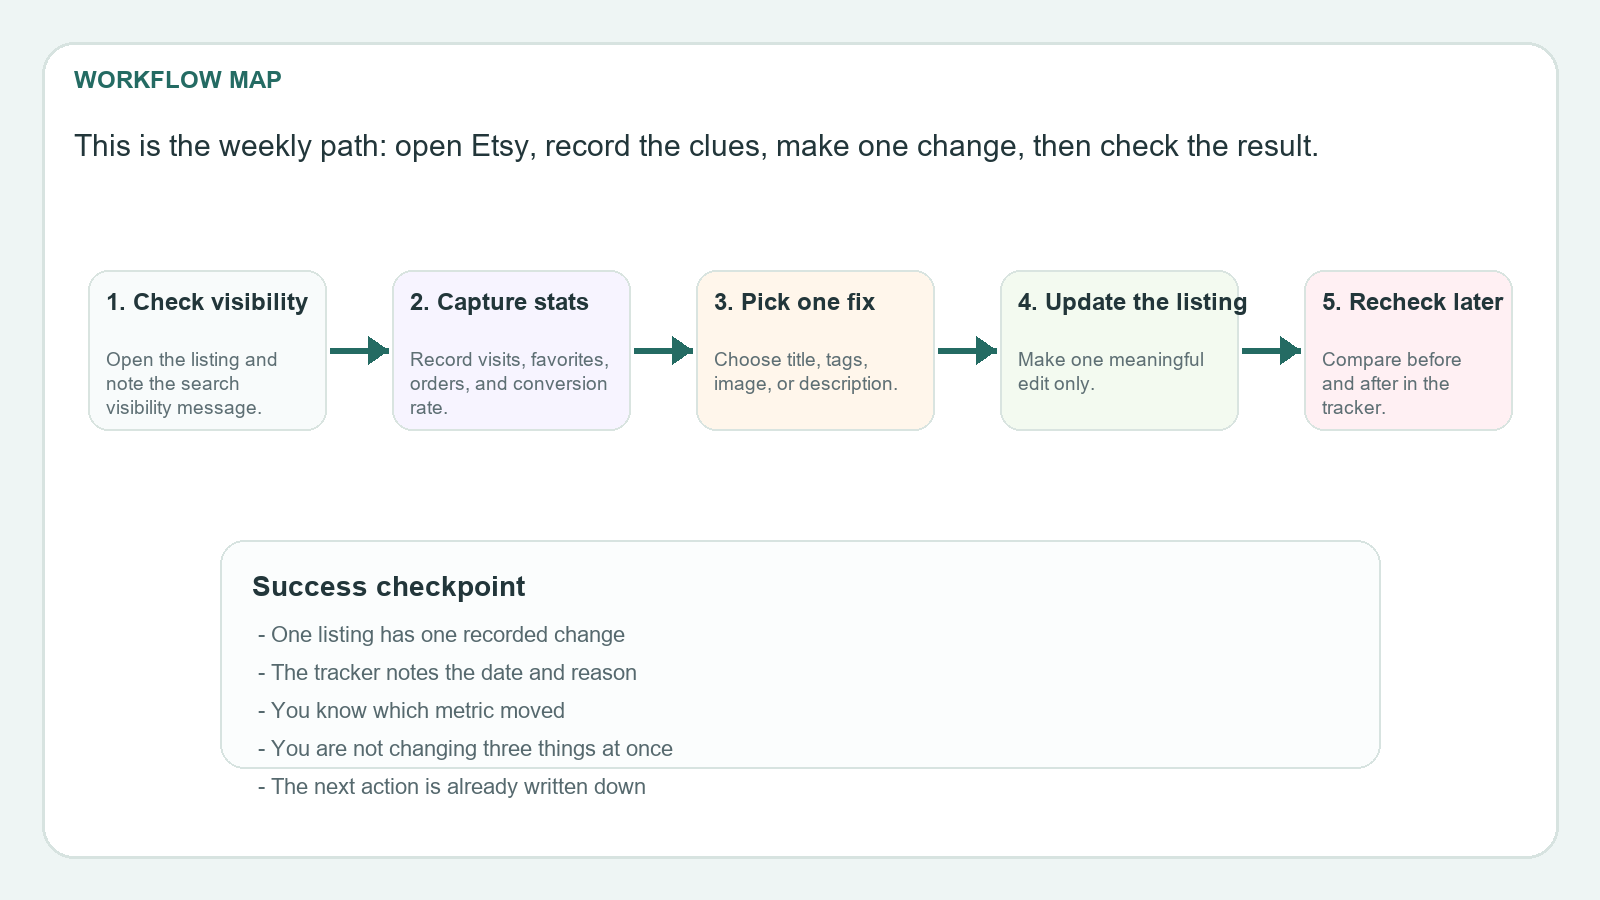
This is the point where many beginners get overwhelmed. They see a low click rate, a low conversion rate, and a visibility note, then they want to change the title, tags, images, description, and price all at once. Do not do that. A useful tracker helps you choose one decision per listing cycle. If the first image is unclear, fix the first image. If the title is too broad, fix the title. If the listing is getting traffic but not sales, look at the product promise or the price.
The best way to keep the decision honest is to write the problem in one sentence. Example: “The listing appears in search but the first image does not explain the editable Canva workflow.” That sentence points to the fix. Another example: “Traffic is coming in, but the title is too generic for a beginner buyer.” That sentence points to a title rewrite. A third example: “Favorites are up, but orders are flat, so the listing may need a stronger offer or clearer usage instructions.”
Once you have the sentence, write the action in the Fix List tab. Give it a due date. That turns the tracker into a small system. You are no longer just looking at numbers. You are making a decision and recording what you decided. That is the part that helps beginners improve without feeling stuck.
Step 7: Make The Tracker Specific To Canva Templates And Digital Products
Template sellers do not need the same tracker as a vintage shop or a handmade jewelry store. A Canva template listing usually depends on clarity, file format, editability, and the buyer’s confidence that the file will actually work. That means your tracker should include columns for the listing type, the promise in the first image, and the piece of the product that is supposed to remove confusion. For example, a Canva template might need a clearer “editable in Canva” message, while a Google Sheets template might need a stronger “make a copy” message.
Digital products also benefit from a simple testing column. Did you open the download path in a fresh browser? Did you check the listing image crop on mobile? Did you confirm the buyer knows what to do after purchase? Those details are not glamorous, but they are often where small sales problems come from. A tracker that captures them helps you fix the right thing first instead of assuming the problem is only traffic.
If you sell multiple product families, give each one a label. Use a product family column and a format column. Then you can sort later by template pack, planner, checklist, or spreadsheet. That makes the tracker useful beyond one listing. You will start seeing which product type needs the most explanation and which one converts better with the same layout. That is the kind of practical insight beginners can actually act on.
Step 8: Add A Weekly Review Routine So The Sheet Gets Used
A tracker is only useful if you look at it again. Set one weekly review day and keep it short. Open the Visibility Log, update the newest listing notes, fill in the latest Stats Snapshot, and choose one next action. If the data did not change much, note that too. Sometimes the most useful information is that nothing moved. That can tell you whether the problem is the listing, the product, or just time.
During the review, ask four questions: What did Etsy say? What did the stats say? What did I change? What do I need to test next? If you can answer those four questions from the sheet, the tracker is doing its job. If you cannot, the workbook is probably too complicated or the notes are too vague. Simplify it until the review is painless.
Keep the review on a calendar so it becomes part of the business routine rather than an optional cleanup task. That matters because beginners often stop using spreadsheets when they feel behind. The sheet should be quick enough that you can finish the review before you talk yourself out of it. A short, repeatable review is better than a perfect but abandoned system.
Step 9: Use ChatGPT To Draft Reminders And Summaries
ChatGPT is useful here if you use it as a summarizer, not a replacement for judgment. Feed it your own tracker rows and ask it to summarize the pattern. Ask which listing change is most likely to help, which stat moved the most, and which note repeated across multiple listings. That can save time when you have a few rows of data and want a quick summary before the weekly review.
You can also use ChatGPT to turn your notes into a short action plan. For example, if your tracker shows that search visibility notes keep pointing to title clarity, ask the model to draft three plain-English title options. If the problem is the first image, ask for one image headline, one support line, and one screenshot-style visual idea. Keep the prompt focused on your own notes, not copied listings. That keeps the workflow original and useful.
Do not let the AI do the thinking for you. Let it clean up the writing and reduce repetition. You still decide what to change. The tracker plus ChatGPT combination works best when the sheet gives you the facts and the model helps you communicate the facts more clearly. That is a better use of AI than asking it to invent a business plan from scratch.
Step 10: Turn The Tracker Into A Small Digital Product
Once the sheet works for you, you can package it as a beginner template for other Etsy sellers. Give it a clear title, simple instructions, and a few prefilled example rows. Include a one-page PDF that says how to make a copy, how often to update the tracker, and what each tab means. Add listing images that show the workbook, the workflow, and the “one change at a time” method. This turns your internal tool into a sellable asset.
That is where the $5/day angle comes in. A simple tracker template can sell as a low-cost starter product if it is easy to understand and easy to duplicate. You do not need a huge bundle. You need one useful workbook that helps a beginner avoid confusion. If the tracker helps a seller make one better decision, it has value. If it has value, it can be sold.
You can also make versions for different niches later. One version for Canva template sellers, one for budget planners, one for Etsy SEO tracking, and one for listing image tests. The format stays the same; only the example rows change. That is a good sign that the product line is real, because it can grow without starting over.
Step 11: Use The Tracker To Build A First $5/Day Path
If you are aiming for a very small first-dollar target, this kind of tracker is a practical way to get there. The first path is not “make money from the spreadsheet itself” right away. The first path is to use the tracker to fix one listing, see one improvement, and then package the workflow as a template. One sale at a low price can be enough to prove that a beginner-friendly system is useful.
Start with one listing that already gets some attention. Record its current stats. Make one fix. Then reuse the tracker for a second listing. After a few cycles, you will know which edits are worth repeating. That repeated work is what becomes your template, your blog post, and possibly your product. The first $5 is often less about traffic and more about proving that the workflow works for real people.
Do not expect every listing to improve on command. Some products will need a better promise, some will need stronger images, and some will need more time. The tracker does not remove uncertainty. It makes the uncertainty visible enough that you can respond with less panic. That is a more realistic goal for a beginner than chasing a guaranteed outcome.
Risks And Warnings
Do not use the tracker to justify endless micro-edits. If you change the title every day, the sheet will tell you nothing useful. Pick one change, wait, then check the result. Do not assume a single stat tells the whole story. A listing can have favorites without sales, traffic without clicks, or a search note without immediate movement. That is normal.
Also be careful not to overstate what the tracker can do. It is a decision tool, not a ranking machine. Etsy’s systems are larger than any spreadsheet. The sheet helps you keep your own process clean. It does not guarantee visibility, sales, or a conversion spike. Use it to make better choices, not to promise outcomes you cannot control.
Finally, keep the tracker readable. If the file becomes too dense, you will stop using it. The best beginner tool is the one you can open, update, and understand in less than five minutes. That is the standard worth aiming for.
What To Do Today
If you want to start now, open Google Sheets and make the four tabs. Then pick one Etsy listing and write down the current visibility note and the latest stats snapshot. Choose one fix. That is enough for day one. If you do that consistently for one week, the sheet will already be more useful than a blank dashboard.
Once the sheet works, save it as a template and reuse the structure for other listings. That is how a simple Google Sheets file becomes a business tool. And if you want to sell it, package the tracker with a short PDF guide and a few clean preview images. The product does not need to be fancy. It needs to be clear, practical, and easy to follow.
Beginner Checklist
- Create four tabs: Visibility Log, Stats Snapshot, Fix List, and Notes.
- Write the date, listing name, and Etsy source for every note you capture.
- Keep only one action per row so the tracker stays focused.
- Use one weekly review day and update the latest snapshot.
- Make a copy of your favorite tracker once it works for you.
- Do not change title, tags, and images at the same time.
- Package the workbook with a short PDF if you plan to sell it.
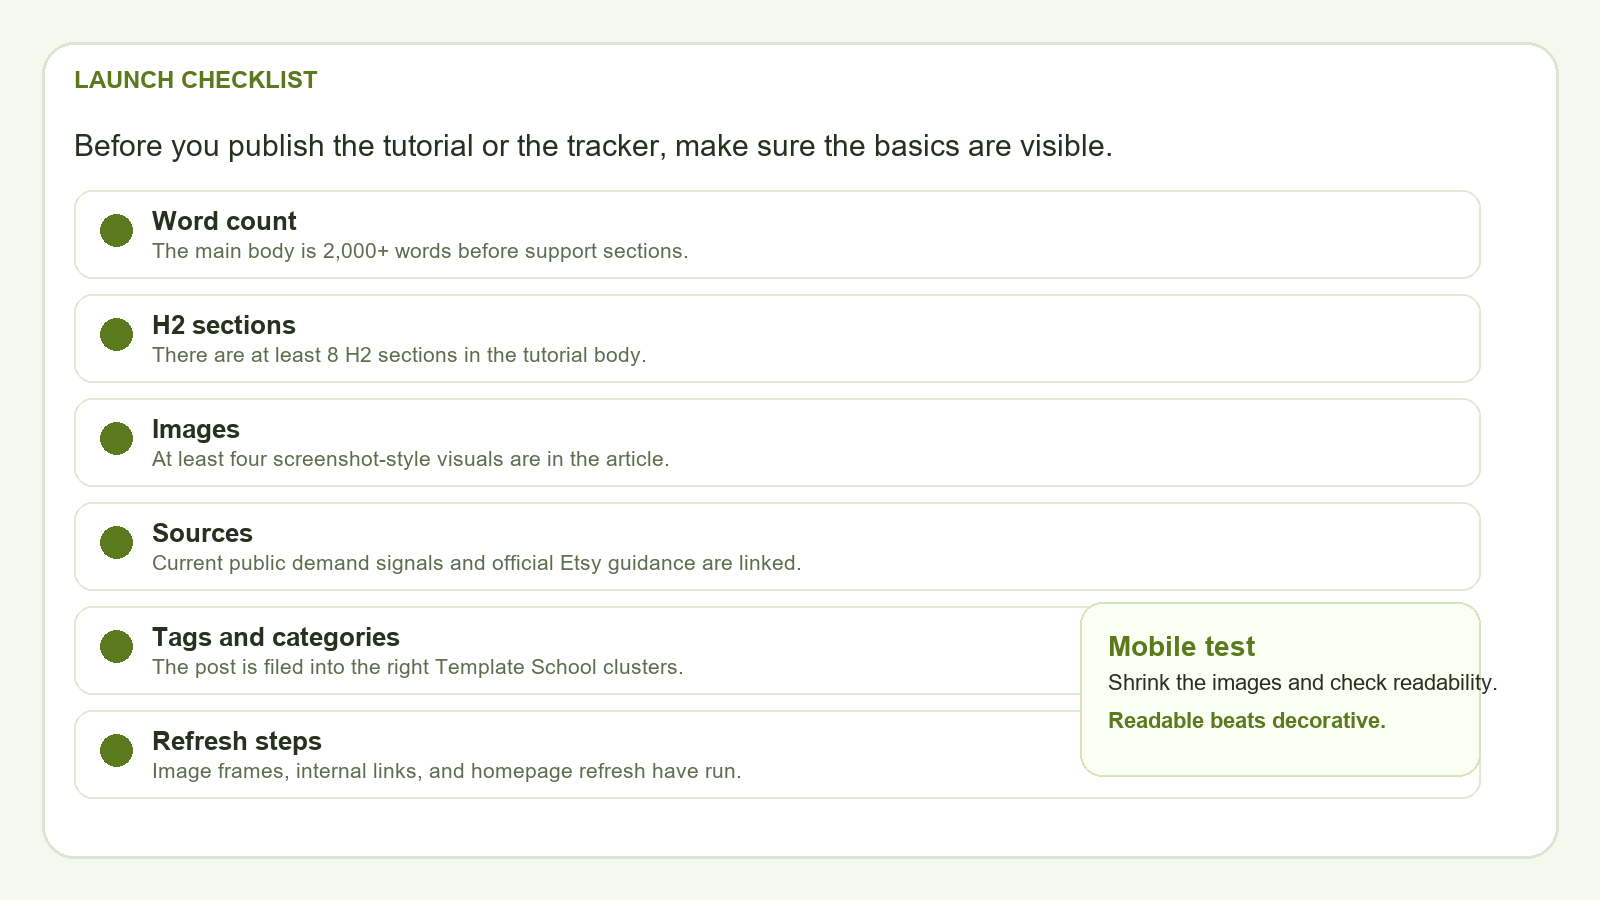
- Check the sheet on mobile so the columns stay readable.
Copy-Paste ChatGPT Prompt
Use this prompt with your own tracker rows and stats snapshots.
You are my Etsy visibility assistant. I sell Canva templates and digital products.

Here are my notes from the tracker:
[paste your own visibility notes, stats snapshots, and fix list]

Help me:
1. Summarize the main pattern in plain English.
2. Tell me which single fix to test next.
3. Write 3 title ideas that match the problem.
4. Suggest 3 listing image ideas for the first card.
5. Turn the notes into a one-sentence weekly action plan.

Rules:
- Use only the notes I provided.
- Do not copy other listings.
- Do not promise income or rankings.
- Keep the advice beginner-friendly and specific.
- Focus on one action at a time.
Current Sources Checked
These are the public guidance pages and demand signals that shaped the tutorial angle.
- Etsy Help: How to Use the Etsy Search Visibility Page
- Etsy Help: How to Use Etsy Stats for Your Shop
- Etsy Help: How to Review the Performance of Your Etsy Ads
- Public Etsy seller discussion: low traffic after improving listings
- Public Etsy seller discussion: search visibility notice for listing titles
Leave a Reply