IdeaVaultHQ Template School
How To Use Canva Bulk Create to Make Etsy Listing Images Faster
A beginner tutorial for turning one product brief into a reusable Canva Sheets workflow that generates Etsy listing image variations faster.
Quick answer: Write one product brief, put the copy into Canva Sheets, connect the fields to a reusable square layout, and Bulk Create the image set instead of building every card by hand. That is the fastest beginner-safe path.
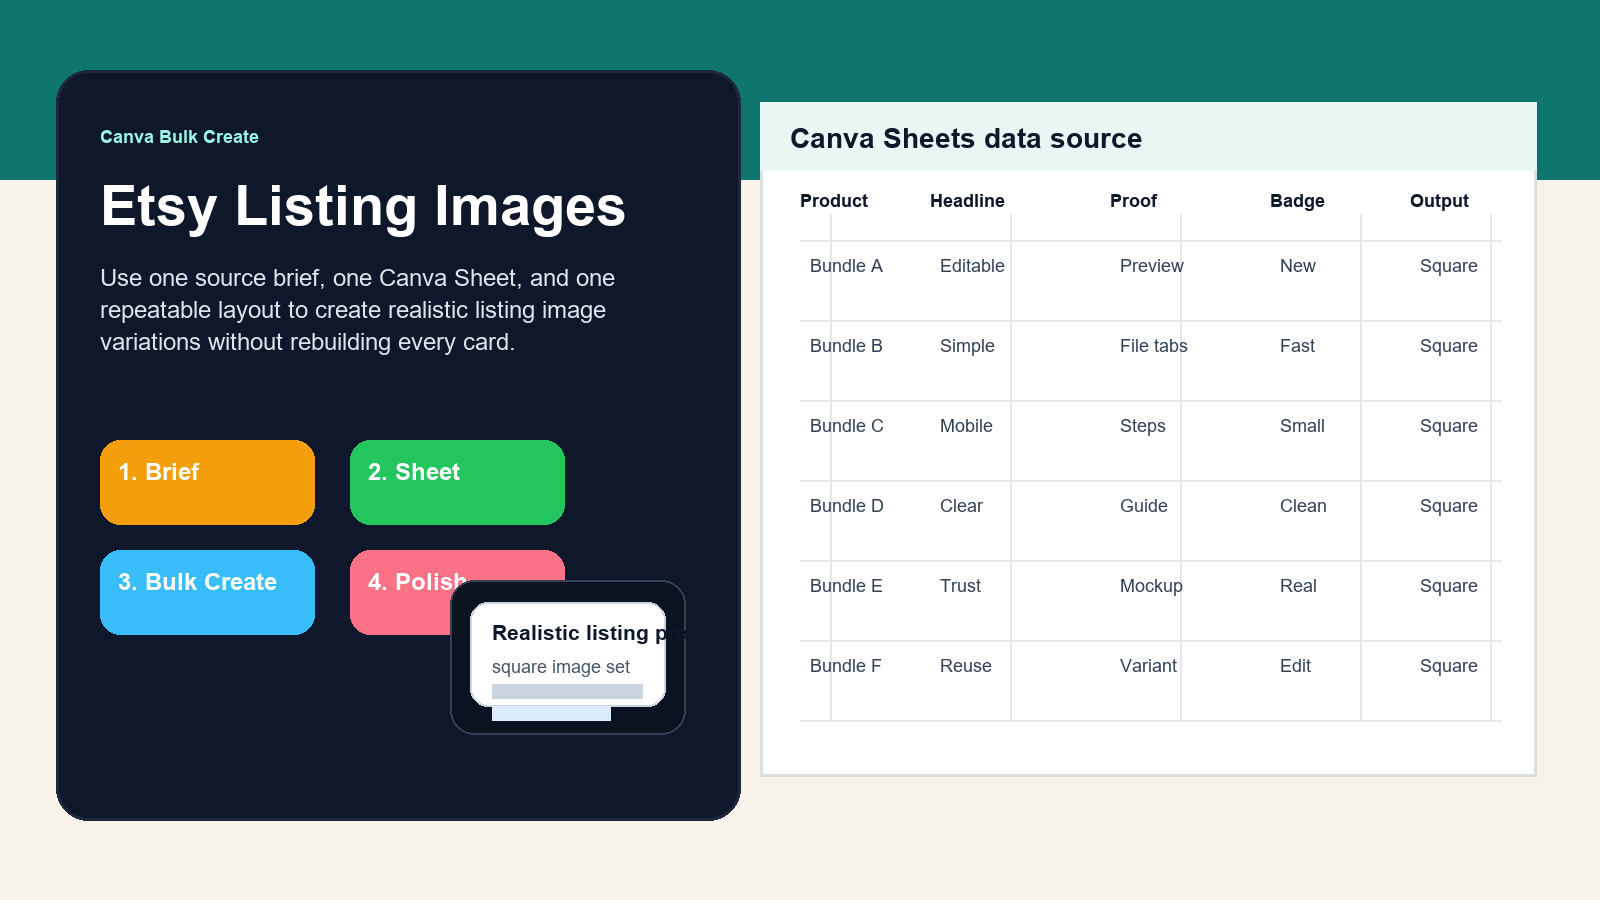
Bulk Create Workflow
Quick answer: If you want Etsy listing images to go faster, do not start by opening Canva and improvising a design. Start by writing one product brief, then build a Canva Sheet that holds the actual copy for every card in the set. Once the sheet is ready, you can Bulk Create multiple listing-image variations from the same structure instead of rebuilding each square by hand. That is the real time saver.
Why this topic is current: recent public discussions are still circling around the same practical problems. One Etsy seller thread asked about automating listing image creation in Canva. Other recent discussions keep returning to the same theme around digital products, templates, and whether practical spreadsheet or Canva-based files still have demand. That is an inference from the public discussions, not a formal market survey, but it is enough to justify a tutorial that shows a beginner how to do the work faster without losing clarity.
This tutorial is for beginners who sell Canva templates, planners, checklists, digital downloads, or simple spreadsheet products and want the listing images to look coherent without starting from zero every time. You do not need to be a designer first. You need a repeatable process. The win here is not speed for its own sake. The win is that a beginner can create a consistent image set, publish faster, and spend more time on the product and less time on the same layout problem.
1. Decide What The Listing Images Must Explain
Before you design anything, decide what the buyer must understand in the first three seconds. For Etsy digital products, that usually means the image set has to answer four questions: what is this file, what do I get, how do I use it, and why should I trust it. If you cannot answer those questions in one short sentence each, the product brief is still too vague. Fix the brief before you touch the design.
This is also where a lot of beginner listings go wrong. They make a pretty square graphic but never say whether the file is editable, printable, instant download, or a template link. Buyers do not enjoy guessing. Etsy’s own help pages point sellers toward clear photos, clear titles, and useful tags because the listing should be understandable, not mysterious. When the listing is obvious, you reduce clicks lost to confusion.
Write a plain statement like this: “This is an editable Canva template for beginner Etsy sellers who want to create listing images faster.” That sentence is enough to guide the rest of the work. If you are making a budget planner, swap in the actual use case. If you are making a checklist, say so. The point is to keep the image set aligned with one real buyer problem.
Once that sentence is written, identify one proof element you can show in the image set. Proof might be a sheet view, a page stack, an editing screen, an export checklist, or a thumbnail test. The proof element is what keeps the listing from feeling like generic promo art. A buyer who sees evidence of the product usually understands the value much faster.
Do not worry about volume yet. One strong first image and a few supporting cards are enough to start. The rest of the tutorial is about making that first sentence repeatable inside Canva Sheets so you do not rewrite the same layout by hand every time.
2. Check The Current Demand Signals First
There is a reason this tutorial is worth publishing now. Recent public seller discussions keep showing the same friction: digital products can be popular, but beginners want a faster way to produce polished assets and listing images without spending all day in the editor. A recent EtsySellers thread asked specifically about automating listing image creation on Canva. In another public discussion, sellers kept pointing out that practical templates and Sheets-based files still come up often when people ask what digital products actually sell.
That matters because it tells you what the buyer and seller pain is. People are not only asking what to sell. They are asking how to make enough versions fast enough to keep moving. That is a different problem than pure design. It is a workflow problem. Bulk Create is a good answer to a workflow problem because it turns a repeatable structure into multiple outputs without forcing you to rebuild the file each time.
Official guidance from Canva also supports this direction. Canva documents Bulk Create, Bulk Create with Sheets, template links, and design sharing. Etsy likewise tells sellers to focus on clear listing photos, accurate tags, and understandable titles. Put together, those signals say the same thing: if you are making digital products, your workflow should be organized around repeatability and clarity. The tutorial angle follows directly from that.
When you look at public demand, do not chase hype. Look for repeated, ordinary questions. “How do I automate this?” is a good question. “What can I sell that saves time?” is another. “How do I make the listing images clearer?” is a third. Those are the kinds of questions that produce practical tutorials because they point to work people really want to finish.
That is why the rest of this guide focuses on one Canva Sheets workflow instead of a vague design inspiration post. The article is meant to teach a method that readers can actually use the same day.
Bulk Create Workflow
3. Open Canva And Set Up The Source Sheet
Start inside Canva and create a new design or open the project you want to build from. Then go to Canva Sheets or the bulk creation area, depending on how your account is labeled. If you are starting from scratch, build the sheet first. If you already have a design, turn that design into the template that the sheet will feed. The goal is to make the source data the center of the workflow.
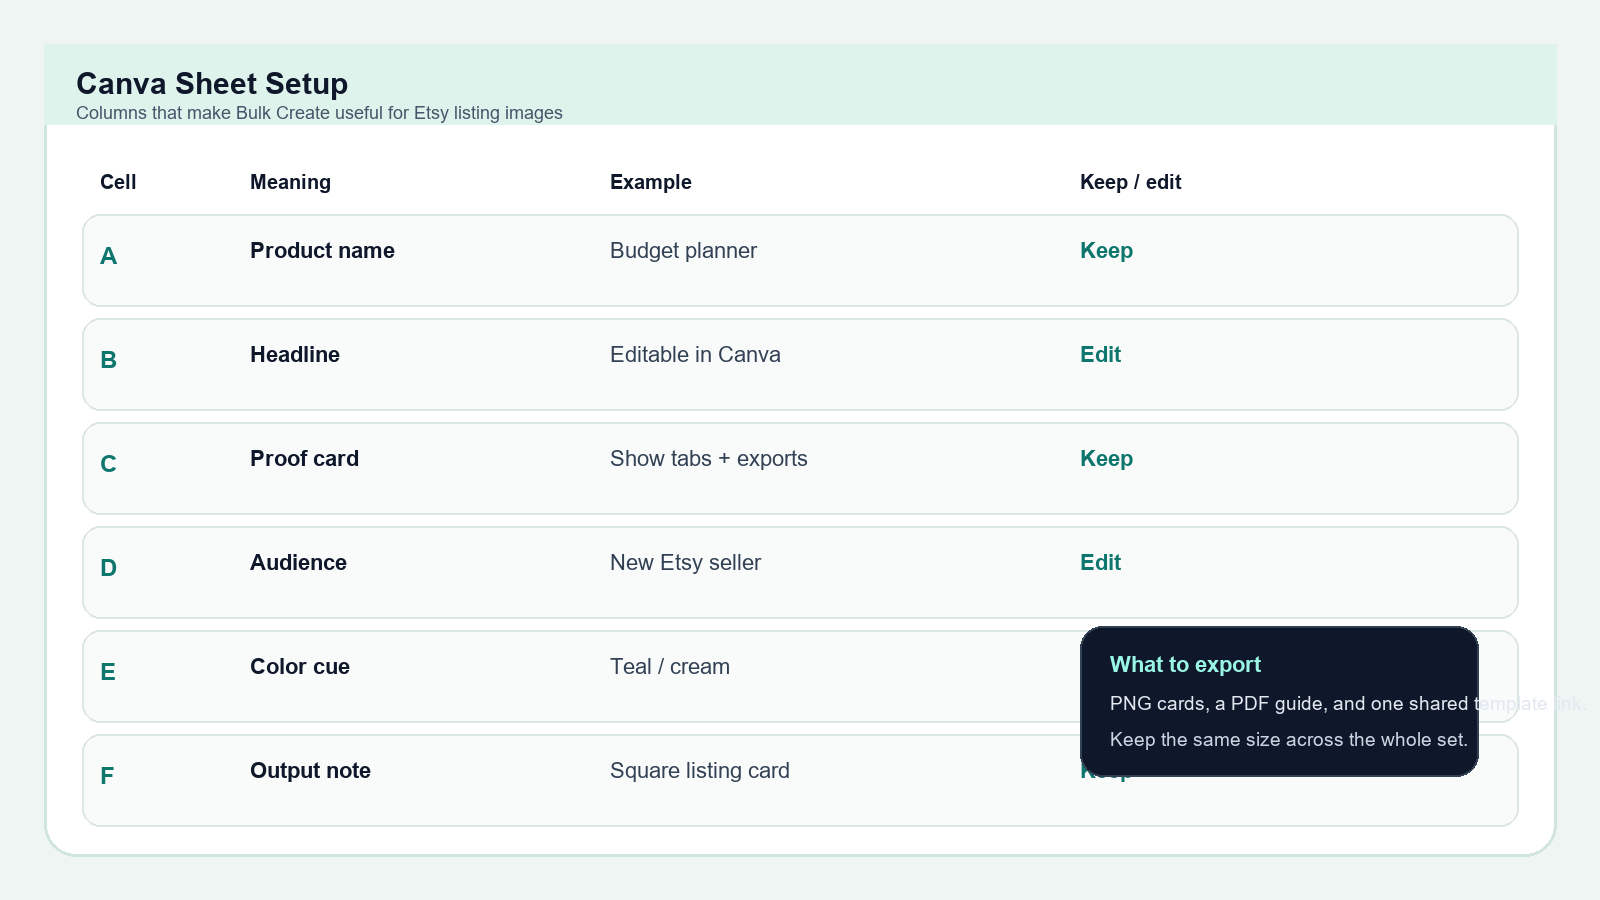
Create columns that answer the exact pieces of copy your listing image set needs. A simple setup is product name, headline, proof line, audience line, color cue, and export note. Keep each column short. The sheet is not the final design. It is the memory system that keeps the final design consistent. If the rows are clean, Bulk Create becomes a predictable production step instead of a guessing game.
Use one row for one listing image card. That rule keeps the output manageable. For example, row one might be the cover card, row two the what-is-included card, row three the how-it-works card, row four the social proof or trust card, and row five the mobile-friendly reminder card. If you are making a template bundle, each row can also stand for a product variation. The exact structure depends on what you are selling, but the logic stays the same.
Give the sheet a plain internal name so you can find it again later. Something like “Etsy Listing Images – Bulk Create Master” is better than a cute name you will forget. The sheet should feel like a production tool, not a scrapbook. That is how you create a reusable system instead of one-off files that are hard to update.
When the sheet is finished, stop and scan the rows. If you cannot explain one row in a sentence, the copy is probably too dense. Simplify it now. Bulk Create makes copy problems visible fast, and that is useful. The faster you see the problem, the easier it is to fix before you publish.
4. Build A Base Layout That Works In Square Crop
The strongest Etsy listing images usually start with a base layout that is boring in the right way. It should be clean, square, high-contrast, and easy to reuse. Do not over-design the first card. Give it a headline, a small proof block, and one visual anchor that ties the whole set together. The layout should work on a phone first, because that is where many buyers see it.
Use one consistent brand treatment across the set. That might be a teal header, a cream background, one bold typeface, and one accent color for proof callouts. The point is not to create a style that screams at the buyer. The point is to create a frame that helps the buyer focus on the product. If your template product already has a strong brand kit, use it. If not, keep it simple. Simple is not lazy here. Simple is readable.
Inside the layout, reserve space for the key proof element. For a Canva template, proof may be a screenshot-style preview of the editor or the editable fields. For a Google Sheets template, proof may be the tab structure and the formula area. For a checklist, proof may be the checklist itself. That proof element should be visible even when the image is small. If the buyer cannot see it at a glance, it is doing too much work in too little space.
Before you map the sheet, make one test card by hand. This first card becomes the style prototype. Once the prototype looks good, you can use Bulk Create to scale the style across the rest of the set. This is the right order: prototype first, automation second. Beginners often reverse that order and end up automating a bad layout.
A useful rule is to keep every card on the same grid. If the headline sits in the top-left on card one, keep the headline area in the same place on the others. Consistency makes the set feel more professional and makes the buyer work less to understand each slide.
5. Map The Sheet To The Layout
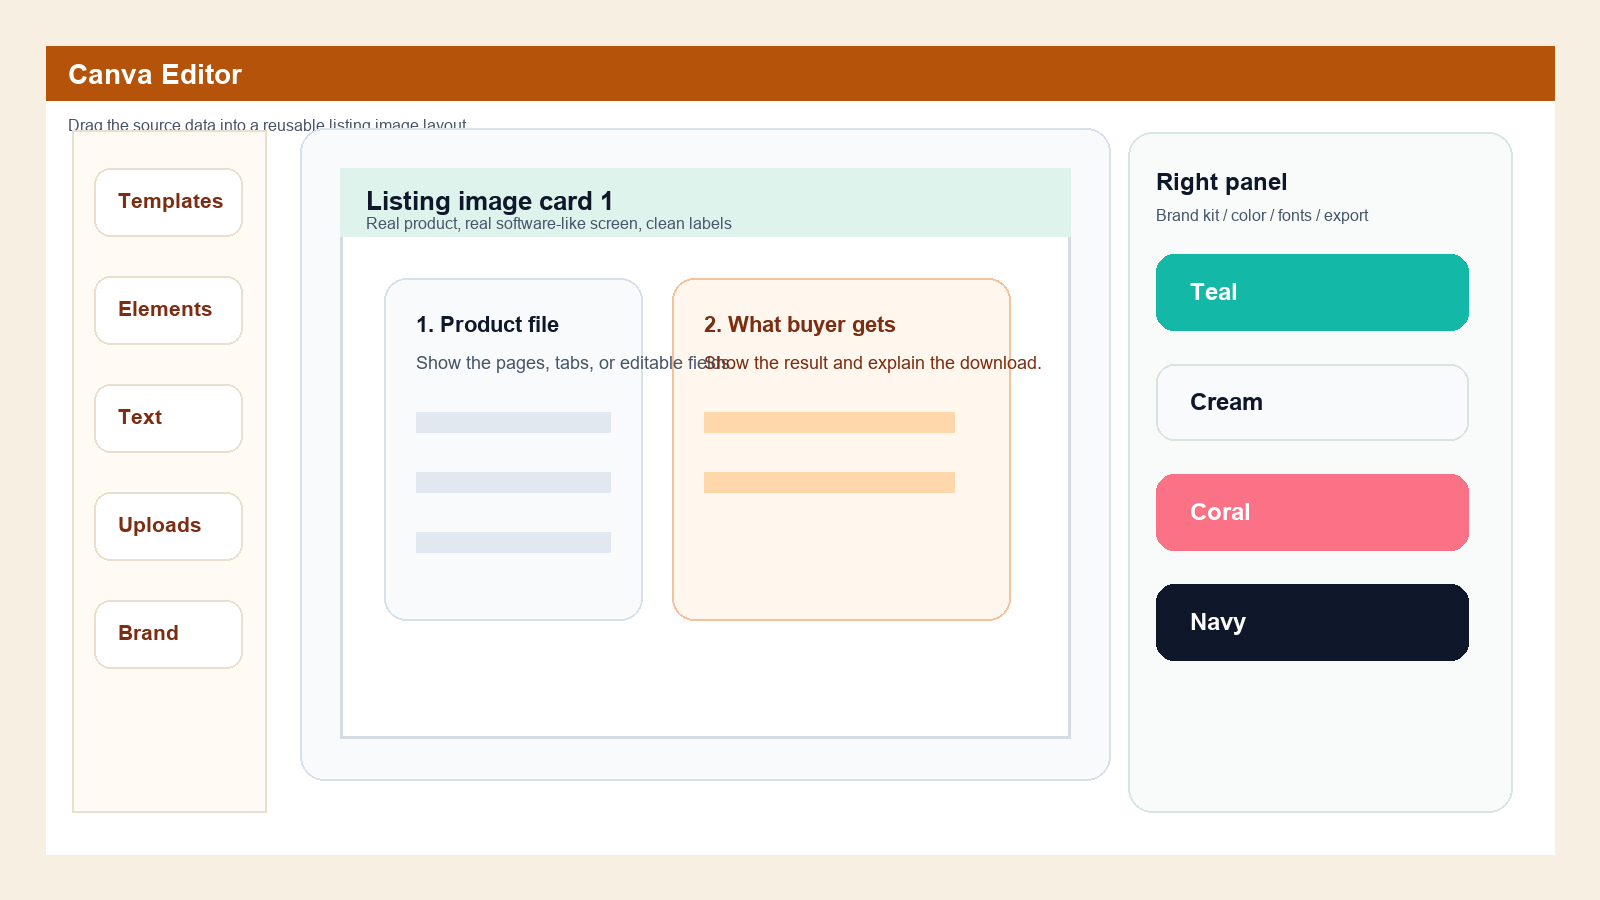
Now connect the sheet to the design. In Canva, match the text fields or page placeholders to the rows you created. If you are using Bulk Create from Sheets, select the relevant cells and connect them to the design elements. If your account uses the older Bulk Create flow, the same idea still applies: the source cells feed the repeated design. The exact button labels may change, but the process is the same. Put the source data in one place and let the design read from it.
Start with the first two or three fields, not all of them at once. That keeps the test easier to read. For example, map the headline first, then the proof line, then the audience line. Preview the output. If the first card looks right, continue to the other fields. If the line breaks look awkward, shorten the copy in the sheet instead of forcing the design to carry too much text. The sheet is the faster place to simplify.
As you connect the fields, watch for three failure points. First, some rows may be too long and break the layout. Second, some rows may create awkward spacing that makes the card feel crowded. Third, some rows may be too similar and make the image set feel repetitive. All three are easy to fix once you see them. The trick is to treat the first run as a proof, not a final production batch.
When you preview the variations, ask whether each card still feels like part of the same product family. The cards do not need to be identical. They do need to look related. That is what makes the listing feel intentional rather than assembled from random screenshots.
If one row is only there because you wanted to fill space, cut it. Bulk Create works best when every field has a reason to exist. You are not trying to maximize the number of fields. You are trying to make the buyer understand the product faster.
6. Generate Variations And Check Every Output
Now run the bulk create step and inspect the results one by one. Do not trust the batch blindly. The point of automation is to save time, not to skip judgment. Look for text that overflows, color blocks that overpower the content, or lines that are too small to read on a phone. If you notice a pattern in the mistakes, return to the sheet and fix the source row rather than editing each output manually.
This is where Canva Bulk Create becomes especially useful for listing images. Once the base structure is right, you can create multiple product-specific versions with the same design logic. A planner set, a checklist set, and a sheet-based product can all share the same layout system while changing the copy and preview content. That keeps your shop visually consistent without making every product look identical.
As you review each output, compare it against the promise you wrote at the beginning. Does card one say what the product is? Does card two show what the buyer gets? Does card three show how to use it? Does card four reduce risk or confusion? If any answer is no, the card needs work. This simple review pass is more valuable than adding extra decoration.
Keep an eye on contrast too. A lot of beginners choose soft, pretty palettes that look nice on a full-size screen but disappear at thumbnail size. That is a mistake for Etsy. High contrast is your friend. Clean edges, clear labels, and enough empty space around the main idea will usually outperform a crowded design with ten decorative elements.
Once the outputs look good, save the project as the master template. Label it clearly so you can duplicate it later. The point of this tutorial is not just to make one listing image set. It is to build a repeatable production path for the next six products.
7. Export Clean Files And Upload Them To Etsy
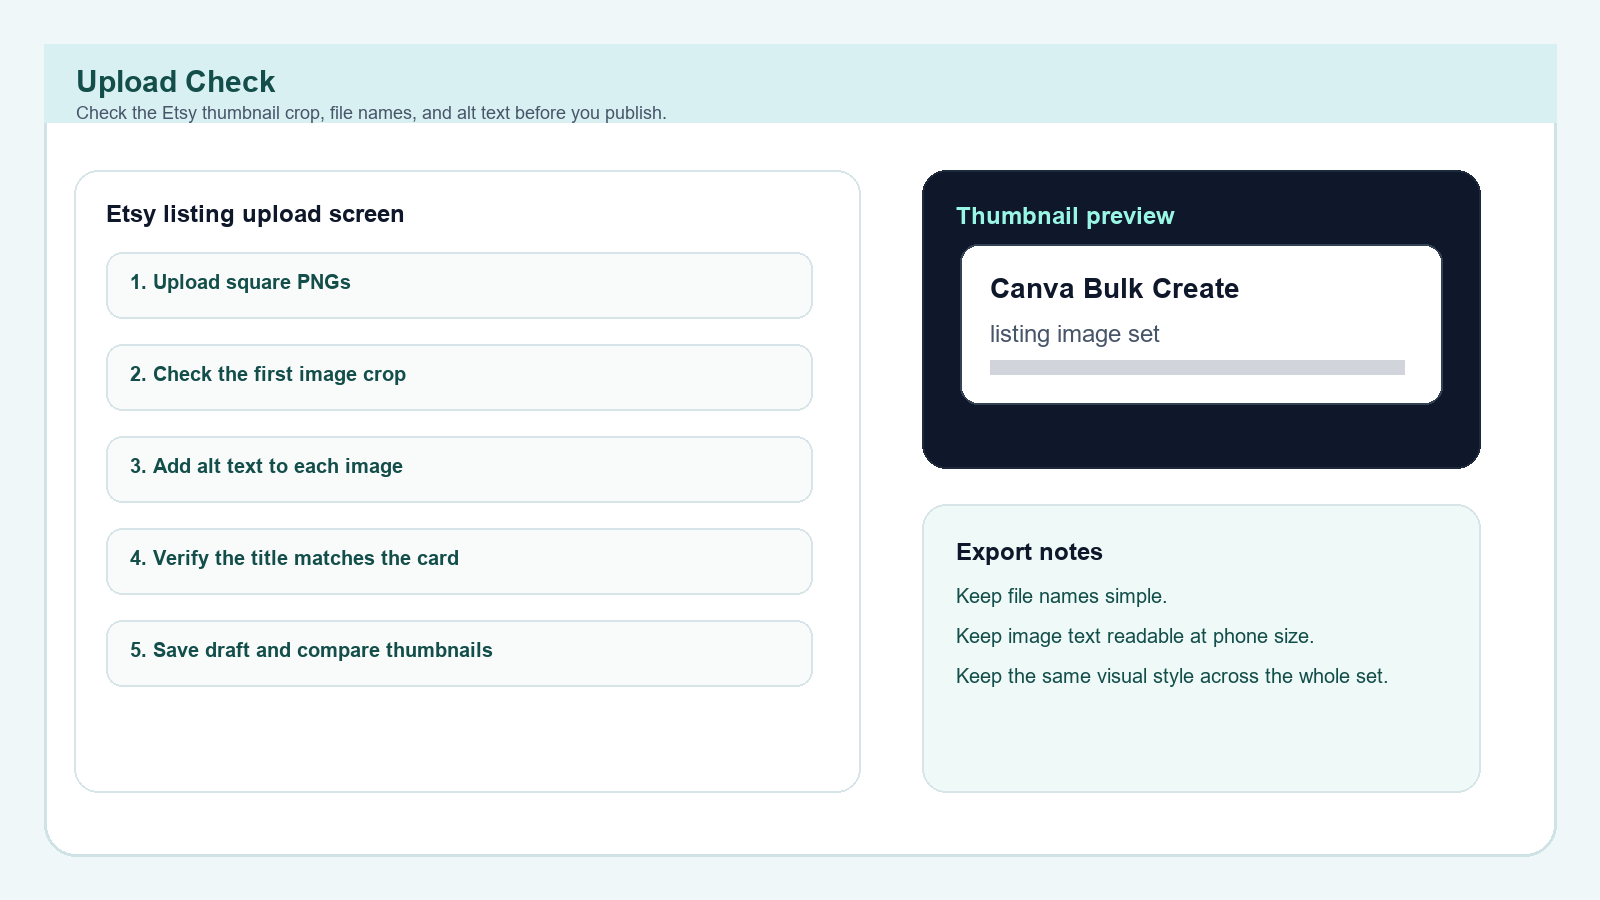
After the images look right, export them in a format Etsy accepts and keep the file names simple. Etsy’s listing image guidance favors clear, high-resolution images, and it recommends listing photos that are at least 2000 pixels on each side. Square images are the safest first choice for this workflow because they stay easier to crop and reuse. If the images are too small or too compressed, the listing loses clarity fast.
Before upload, check the thumbnail crop. A good image in a desktop preview can become a weak image once Etsy crops it. Make sure the main headline is still visible and the proof element is still inside the frame. If the important content gets clipped, move it inward or reduce the amount of text. The listing should still make sense when it appears tiny in search results.
Add alt text after upload when the platform allows it. Etsy says alt text helps describe the image for people using assistive technology and also helps search engines understand the content. Keep it descriptive and specific. “Editable Canva listing image template for Etsy digital products” is better than a vague phrase like “template image.” The alt text should reflect the actual card, not a keyword pile.
When you upload the images, make sure the first image is the strongest summary card. Etsy guidance emphasizes the first image and thumbnail clarity, so lead with the card that explains the product fastest. The remaining images should support that first promise, not distract from it. If you have a strong back-end workflow, the first image becomes much easier to standardize.
As a final check, preview the product on mobile if possible. If you can read it on a phone, it will usually survive Etsy’s smaller contexts better. That is the right standard for this kind of product.
8. Write The Listing Title, Tags, And Captions Around The Same Intent
Your title should sound like the search phrase a real buyer would type, not like a slogan from a design portfolio. For this tutorial topic, a title such as “Canva Bulk Create for Etsy Listing Images” or “How To Use Canva Bulk Create to Make Etsy Listing Images Faster” is more useful than a vague branding phrase. It tells the buyer what they are getting and tells Etsy what the page is about.
Tags should stay accurate and varied. Etsy says tags are opportunities to match shopper searches, and the platform allows up to 13 tags per listing. Use that space wisely. For a product like this, good tag families might include Canva Bulk Create, Etsy listing images, digital products, template tutorials, Google Sheets templates, sell on Etsy, product research, and Canva templates. Each tag should reinforce a different part of the same idea.
Do not throw in unrelated traffic bait. If the product is a tutorial for Etsy listing images, the tags should not drift into random planner or wedding terms just because those niches sell. That kind of mismatch can make the listing confusing and may attract the wrong clicks. A small, focused listing that clearly matches its tags is usually better than a broad one that gets more noise than interest.
Write your image captions and on-page support copy the same way. Reuse the buyer language from the sheet. If the buyer cares about editable Canva files, say editable. If the buyer cares about speed, say faster. If the buyer cares about a cleaner workflow, say reusable system. The more the title, tags, and images agree, the easier the product is to understand.
This is also the point where you can create a small reusable caption bank. A few consistent phrases, such as instant download, editable in Canva, works with a simple sheet, and built for beginner sellers, can save time later. Keep the copy honest. It should describe the actual file, not promise magic.
9. Turn One Listing Into A Reusable Production System
Do not stop after the first set of images works. Save the design, duplicate the sheet, and reuse the same structure for the next product. That is where Bulk Create becomes more than a convenience. It becomes a production system. The first version teaches you which rows matter most, which words are too long, and which visual style is easiest to read. The second version is faster because the hard decisions are already made.
Build a small internal library of prompt lines, headline patterns, proof lines, and buyer phrases. For example, you can keep a master tab for planner cards, a second tab for checklist cards, and a third tab for spreadsheet products. Each tab can reuse the same design language while swapping the actual product copy. That makes your brand feel consistent without making every product identical.
If you want to scale beyond one listing, make one template per theme, not one template per random product. A theme could be “beginner Etsy seller tools,” “budget planners,” or “small business trackers.” Themes make the workflow easier to repeat because the audience and the proof style stay similar. That means less rewriting and fewer layout surprises.
One of the most useful side effects of this system is that it helps with future content. If you know how the image set is built, you can turn that same process into a blog post, a product brief, a social post, or an email pitch. The workflow becomes an asset, not just a design file. That is the kind of reusable work a beginner should be aiming for.
When you save the master file, add a note to yourself about what worked. Write down the sizes, the safe margins, the headline length that fit best, and the proof element that felt strongest. Those notes are worth more than a dozen vague inspiration folders.
10. Know The Risks Before You Rely On Automation
Bulk Create is useful, but it does not replace judgment. The first risk is that the same layout may look repetitive if you use it too often without changing the structure. The second risk is that source rows can silently create awkward copy if you write too much in each cell. The third risk is that a nice-looking set can still be unclear if the product promise is buried under decoration. Automation amplifies what you put into it. It does not fix a weak brief.
There is also a licensing and originality risk. If you are using Canva elements, templates, or brand assets, make sure your usage follows Canva’s terms and your own product rules. If you are building a template for sale, the design should be original and the buyer instructions should be clear about what is editable, what is included, and what is not. Do not rely on the buyer to guess the workflow.
Another issue is over-optimizing for the tool instead of the market. A workflow can be efficient and still miss the buyer’s actual need. If a product needs a simpler explanation or a different file format, change the product. Do not force a workflow onto the wrong idea. The right workflow should make a good product easier to explain, not rescue a bad product from confusion.
Finally, remember that Etsy search is not static and public demand shifts. Your job is not to lock onto one tactic forever. Your job is to observe, test, and refine. A clear listing image system is still valuable because clarity tends to survive trends better than gimmicks. If you build the structure right, you can update the copy and keep moving.
The cleanest beginner takeaway is simple: one brief, one sheet, one base layout, one bulk create pass, one review pass, one upload. That is enough to publish without making the process bigger than it needs to be.
Beginner Checklist
- One buyer phrase chosen from Etsy search and public demand signals.
- One Canva Sheet built with columns that map to listing image cards.
- One base layout designed before any bulk generation starts.
- One review pass for crop, contrast, and mobile readability.
- One export routine for PNGs, alt text, and the template link.
- One simple product brief saved for the next listing set.
Copy-Paste ChatGPT Prompt
You are helping me turn one template product into a faster Etsy listing-image system.

Please help me:
1. Define the buyer in one sentence
2. Suggest a simple product format for Canva Bulk Create
3. Draft a plain-English Etsy title
4. Write 13 Etsy tags using real buyer language
5. Suggest the five listing image cards I should make
6. List the main risks or confusion points a beginner might hit
7. Turn the idea into a simple 7-day launch plan

Keep it practical, specific, and beginner-friendly.Current Sources
These are the public guidance pages and live demand signals used to shape this tutorial.
- Etsy Help: SEO for shop and listing pages
- Etsy Help: listing image best practices
- Etsy Help: how to use tags to get found in search
- Canva Help: create designs in bulk
- Canva Help: create designs in bulk with Canva Sheets
- Canva Help: share your design as a template link
- Recent public demand signal: automating listing image creation on Canva
- Recent public demand signal: practical templates and Sheets keep showing up
Continue Learning On IdeaVaultHQ
This guide is one stop in the IdeaVaultHQ Template School path. Keep moving through the related guides below instead of stopping at one article.
- IdeaVaultHQ home page
- How To Create Etsy Listing Images in Canva That Explain Digital Downloads Fast
- How To Research Etsy SEO Keywords for Canva Templates in Google Sheets
- How To Create A Canva Budget Planner Template To Sell On Etsy In 2026
- Template Tutorials
- Canva Templates
- Sell On Etsy
- Digital Products
Continue Learning On IdeaVaultHQ
This guide is part of the IdeaVaultHQ Template School path. Use the links below to keep moving instead of stopping on one article.
Success Diagram For This Idea
This is the practical path from reading How To Use Canva Bulk Create to Make Etsy Listing Images Faster to turning the idea into a small testable offer.
Leave a Reply