What This Tutorial Builds
This tutorial shows you how to package one Canva template product so a buyer can open it, understand it, and edit it without sending you a support message first. The workflow uses three parts that already show up in current Etsy and Canva guidance: a Canva template link, a Google Drive folder that holds the delivery files, and a short PDF instruction sheet that explains the first three clicks. If you sell digital products, that combination matters because the buyer is not buying a physical package. They are buying clarity.
The current demand signal is simple: buyers keep shopping for templates, planners, prompt packs, and digital downloads, but they also need the product to be obvious. Etsy’s Seller Handbook explains that digital downloads can reach different audiences and save time for sellers, while Etsy Help reminds buyers that digital files are accessed through the Purchases page on desktop or mobile browser. Canva’s help docs also make it clear that template links let people use your design as a template, which means your delivery system has to match the way Canva actually works.
So the goal is not to build an elaborate launch machine. The goal is to create one clean delivery pack that a beginner buyer can follow in one sitting. If the buyer can find the file, click the link, make a copy, and get back to work, you have a product that can scale without turning into a support nightmare.
Why Clear Delivery Sells Better Than A Pretty File
Many first-time template sellers spend most of their time making the product itself look polished and very little time making the handoff clear. That is the mistake this tutorial fixes. A buyer who lands on a Canva template listing is usually not asking, ‘Is this visually nice?’ They are asking, ‘Will I know what to do once I pay?’ The best packaging answers that question before the buyer has to search for help.
Current public demand leans toward products that remove setup friction. Etsy market pages for digital products keep surfacing planners, bundles, guides, and editable templates because shoppers want a shortcut. They do not want an empty idea. They want a file that helps them do something this afternoon. That is why the delivery pack matters as much as the design. If the buyer gets stuck at the first download screen, the product may still be good, but the experience will not feel good.
Think of packaging as the quiet part of the sale. It is not the headline, but it controls the review you get later. Clear delivery can reduce refund requests, lower repetitive questions, and make a modest template feel more professional. It also gives you a reusable structure for future products, which is where the real leverage starts.
Pick One Template Product Before You Build The Pack
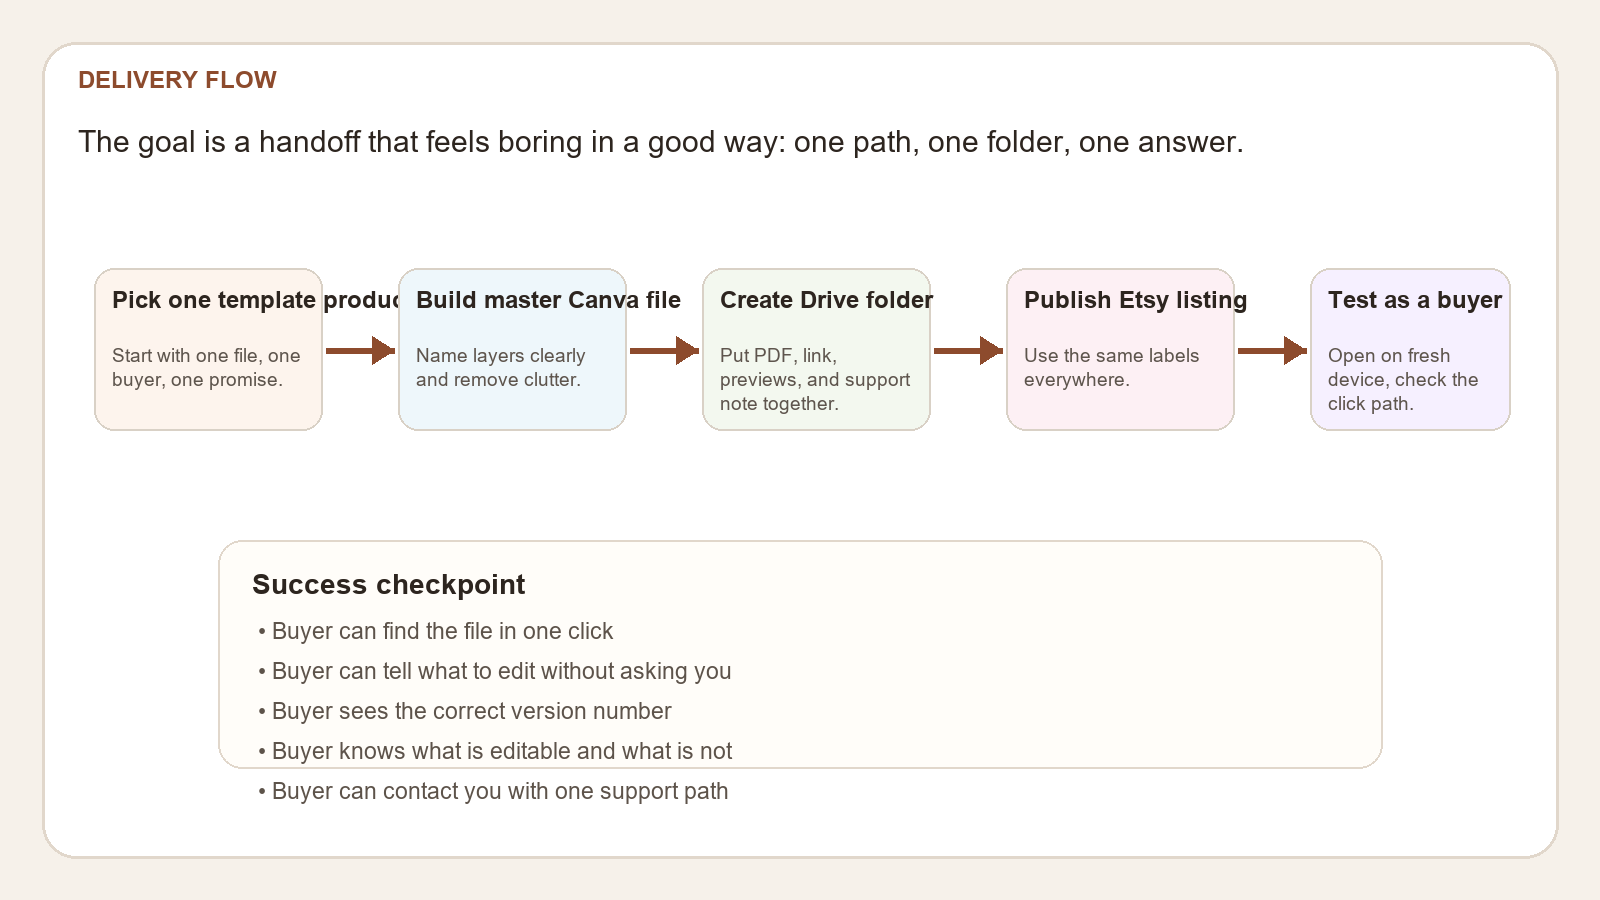
Start with one product, not a whole shop. Choose something small enough to explain in one sentence. Good beginner examples are a social media template set, an email signature template, a simple planner page, a brand board, or a printable checklist. The important part is that the product has one main action. The buyer should either edit text, swap images, or duplicate pages. If the product tries to do all three at once, the instructions get messy.
Write the buyer promise before you touch the design file. For example: ‘A 10-page Canva template for a launch checklist that you can personalize in ten minutes’ is much easier to package than ‘a versatile business template bundle.’ The second phrase sounds bigger, but it creates more support friction because it does not tell the buyer what happens after purchase. A specific promise helps you decide what belongs in the folder, what belongs in the PDF, and what belongs in the listing.
If you already have a template in Canva, open it and strip out anything you do not want the buyer to edit. Rename layers, pages, and sections before you package. Clear names inside the editor make your instructions shorter because you can point to the exact item the buyer should change. That is the difference between ‘edit the title box’ and ‘edit the blue top-left text field on page 2.’ The second version sounds more awkward, but it actually works.
Create The Master Canva File First
Open the master Canva file and treat it like the source of truth. Before you package anything, make sure the design is clean, editable, and free of accidental clutter. Remove old notes, hidden layers, stray test elements, and placeholder comments. If the template is meant for buyers, the file should not look like a working draft you forgot to close.
Use clear naming in the editor. Label pages in a way the buyer will understand. If the product has multiple sections, group them by task rather than by internal design logic. For example, ‘cover page,’ ‘edit page,’ and ‘final preview’ are more helpful than ‘canvas 1,’ ‘canvas 2,’ and ‘canvas 3.’ Small naming choices change how quickly a buyer can make sense of the file.
If you are using Canva Brand Kits or brand templates, keep the packaging notes aligned with the actual sharing method. Canva’s help center explains how template links work and also documents brand kits, bulk create, and sharing via links. That means your instructions should not pretend the buyer needs a complicated workaround. Tell them exactly where to click in Canva, what the share link does, and what kind of copy they should make.
A good check here is to open the file in a separate browser window and ask yourself three questions: can a stranger understand this in under a minute, can they see what is editable, and can they tell what the file is for without reading a paragraph? If the answer is no, fix the file before you build the delivery pack. Packaging cannot rescue a confusing master file.
Build The Google Drive Delivery Folder
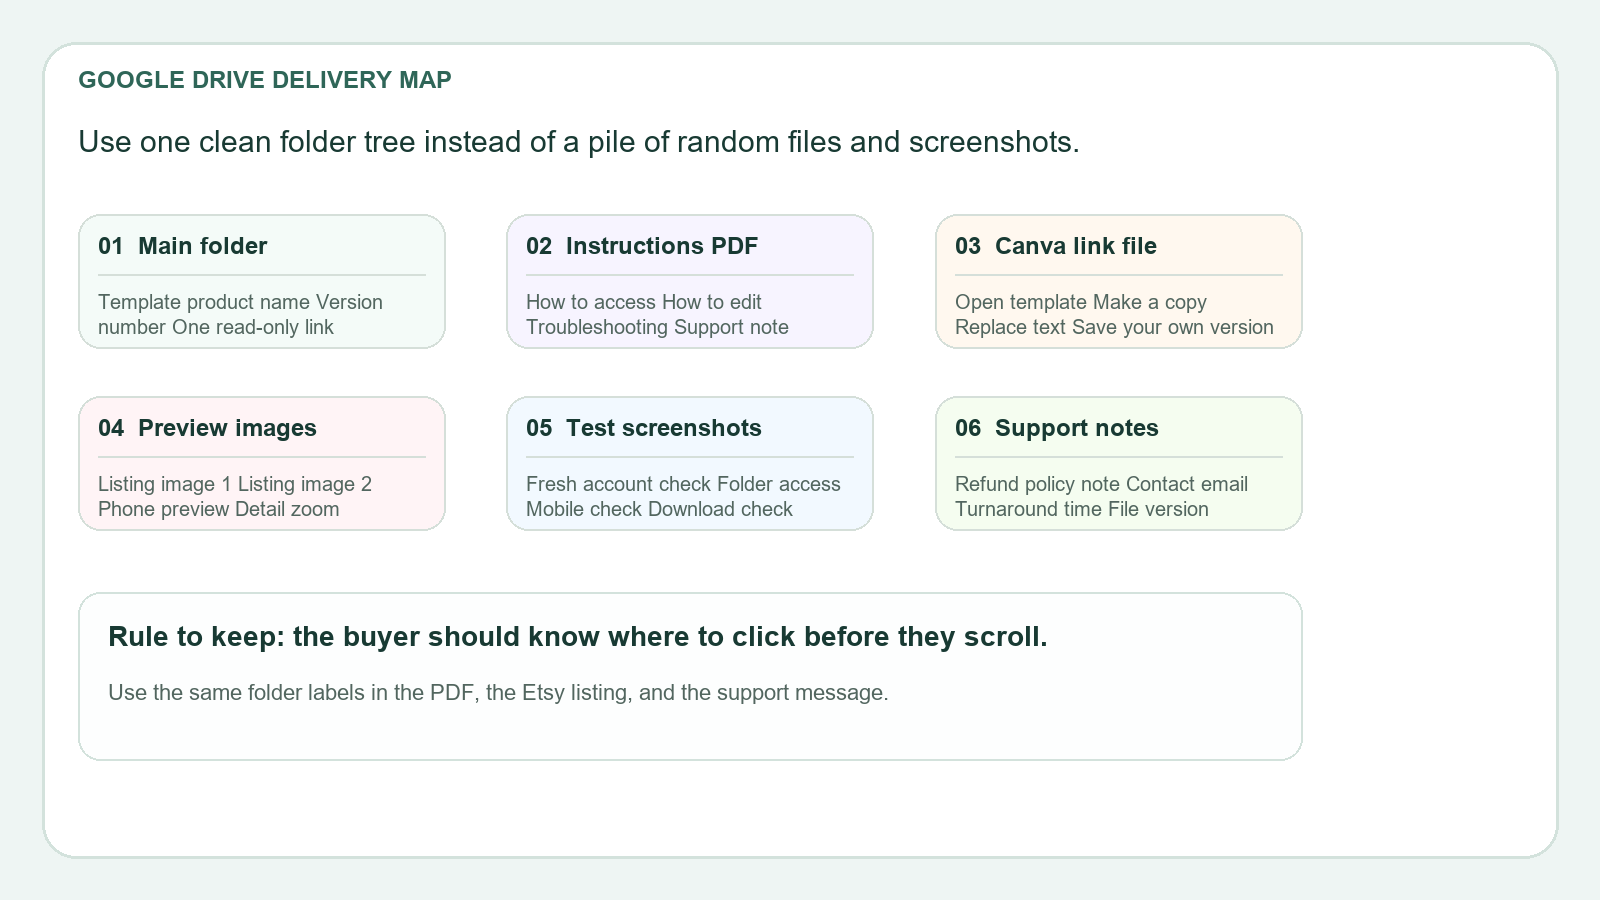
Now create the delivery container. In Google Drive, make one top-level folder with the product name and version number. Keep the name short enough that you can repeat it everywhere: inside the PDF, inside the Etsy listing, and inside the support message. Consistent naming is boring, but boring is exactly what you want here. The buyer should never wonder whether the file they opened is the right one.
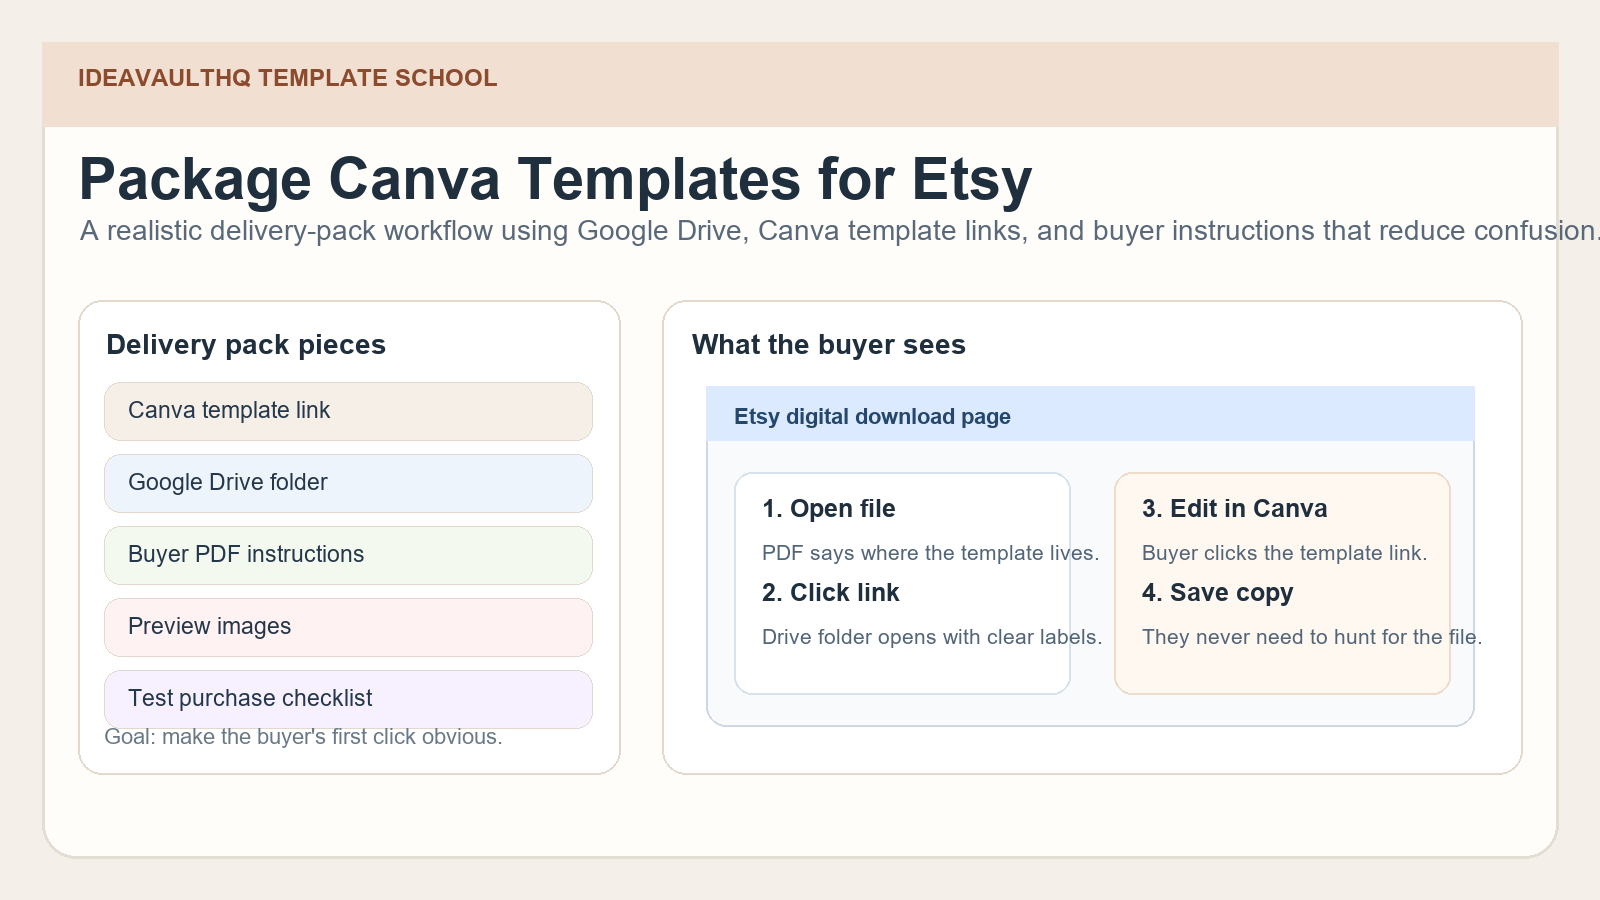
Inside that folder, keep the structure simple. Use one file for the instructions PDF, one file for the Canva template link, one folder for preview images if you need it, and one short support note if the product requires extra context. Do not bury the buyer in nested folders. If you create three or four layers of folders, the handoff starts to feel like a scavenger hunt. That is not premium. That is confusing.
Google Drive’s sharing help is useful here because it reinforces how folders and files are actually shared and accessed. If you are using a shared drive or a team workspace, make sure permissions are intentional. If the buyer only needs to view the instructions and open the template, they should not be given edit access to the whole delivery folder. Give access only where it is needed. Less access usually means fewer mistakes.
This is also where you think about version control. Add a version number to the folder, the PDF, and the listing image alt text if you want the workflow to stay maintainable. Later, when you update the template, you can move from v1 to v2 without rewriting your entire shop. That one habit saves time as soon as you have more than one product live.
Write Buyer Instructions That A Beginner Can Follow
The instruction PDF should read like a hand-holding checklist, not a technical manual. Use short sections with direct verbs. Start with what the buyer will see after purchase, then explain what to click first, then show how to save a copy, and then show where to edit the template. Do not bury the key action in a paragraph about your process. The buyer does not need your backstory. They need the next step.
A strong instruction sheet usually answers five questions: where do I find the file, how do I open it, what can I edit, what do I not edit, and what do I do if something breaks. If you answer those questions in plain language, you solve the majority of beginner problems before they happen. Add one support email or contact path near the bottom, and keep the tone calm. Buyers are less likely to panic if the file sounds like it expected them to be new.
Use labels that match the actual screen the buyer will see. If Canva says ‘Use template’ or ‘Make a copy’ in your flow, use those words in the PDF. Do not substitute a vague phrase like ‘clone the design’ just because it sounds more clever. Precise language reduces friction. The more closely your instructions match the interface, the less likely the buyer is to get stuck.
When in doubt, test whether a friend or family member can follow the PDF without speaking to you. If they pause to ask what a line means, rewrite that line. You are not trying to impress experienced designers. You are trying to remove uncertainty for a beginner buyer who may be opening their first Canva template ever.
Create Etsy Listing Files And Preview Images
Once the delivery pack is clear, build the Etsy listing assets around it. Your main preview images should teach the buyer what they are getting, what is included, and how the delivery works. Do not assume the buyer will read the description before deciding. On mobile, they often look at the first few images and make a fast judgment. That means the images need to do some of the teaching.
Use the preview set to show the finished product, a zoomed detail view, the folder or file structure, and a simple step list. If the product is editable in Canva, say that in the image itself. If the buyer receives a PDF with a link, show that file path visually. If the product has multiple pages, show the range of pages or the page count. Buyers are more comfortable when they can see the shape of the offer before they buy.
Etsy’s digital item guidance is helpful because it reminds you that buyers will receive the file through the purchase flow and then download it from their account. Build your listing around that behavior. If the product is a Canva template, the listing should explain that the buyer receives instructions and a link, not a mysterious attached editable design file. Clarity here prevents the common ‘I can’t open this’ message later.
Add a small support note in the product description or PDF that explains what the buyer should do if the link does not open immediately. That note should not be defensive or overly legalistic. It should simply tell the buyer to check the file type, reopen the PDF, and contact support if the link is broken. Tiny operational notes tend to calm people down.
Test The Full Delivery Flow Like A Real Buyer
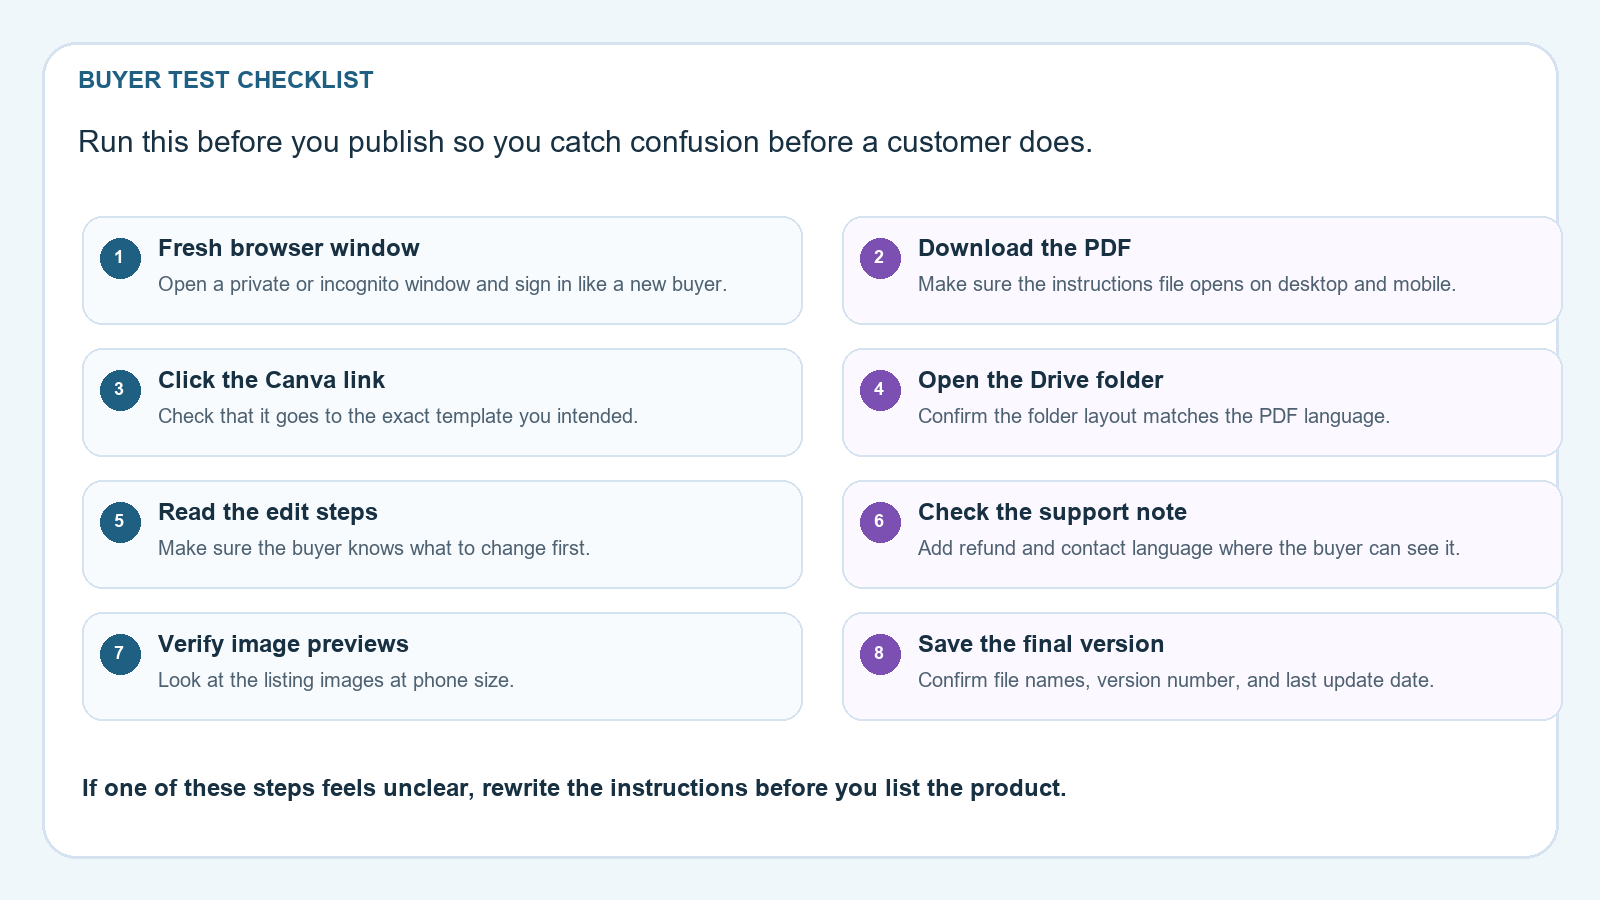
Testing is where the packaging becomes real. Open a private browser window or use a different device so you are not seeing cached access or editor permissions. Then walk through the exact path a buyer will use: buy the product, open the download, read the instructions, click the template link, and save a copy. If any step feels even slightly unclear, fix it before you publish.
Look for three classes of problems. First, permission problems: can the buyer actually open the shared item? Second, comprehension problems: does the buyer know why they are opening this file and what to do next? Third, mismatch problems: do the labels in the PDF match the labels in the folder and the listing? These problems are usually more dangerous than design flaws because they create support messages rather than a small visual annoyance.
Test the flow on mobile as well as desktop. Etsy buyers often browse on phones, and small text can make a good product look hard to use. If the preview images or instruction PDF rely on tiny captions, increase the type size. If the template link is buried in a long paragraph, move it to the top of the file. The test is not about whether the workflow is technically possible. It is about whether the workflow is easy enough that a tired buyer can finish it without frustration.
If you want a simple standard, use this rule: a buyer should be able to find the main file in one click, open the template in two clicks, and understand the next action in under ten seconds. That is a strong enough bar for a beginner product and a practical enough bar for a real Etsy shop.
Turn One Delivery Pack Into A Repeatable Shop System
After the first product works, the real advantage is repeatability. Build a folder template for every new product so you never have to invent the structure again. Use the same sequence: master Canva file, instruction PDF, preview images, support note, test checklist, and listing description. The only thing that should change is the product-specific content.
You can also turn the delivery pack into a production checklist for future listings. When a new idea comes in, ask whether the product needs a Canva link, a PDF guide, a Drive folder, or a zip file. If the answer is yes, reuse the structure from this tutorial. That is how a single tutorial becomes a shop operating system rather than a one-off article.
This is where the current trend data helps again. Etsy shoppers continue to buy digital products that save time, and Canva keeps improving template sharing and bulk creation features. That combination favors sellers who can move quickly without sacrificing clarity. A clean delivery pack lets you ship more products with fewer support headaches, which is how a beginner shop becomes more professional over time.
If you later add bundles, upsells, or product variations, keep the same delivery philosophy. Do not create a bigger bundle just because you can. Create a better one that still tells the buyer exactly what to do. The most scalable template shops are not the ones with the most files. They are the ones with the fewest moments of confusion.
Common Mistakes And The Fixes That Actually Matter
The most common mistake is writing instructions for someone who already knows the tools. If you skip the obvious steps because they feel obvious to you, the buyer pays the price. Spell out the obvious steps. A beginner tutorial should feel slightly over-explained rather than slightly under-explained. That is not wasted space. It is customer support you wrote before the sale.
Another mistake is making the folder structure too fancy. A nicely labeled top folder and a few clearly named files are usually enough. You do not need a miniature operating system inside Google Drive. If the folder looks like a project management app, simplify it. Your buyer wants access, not a tour.
A third mistake is confusing what is editable and what is not. If the template includes fonts, images, or design elements that should stay fixed, say so. If the buyer is supposed to edit only text fields, say that too. The more explicit you are, the fewer ‘How do I change this?’ messages you get later.
Finally, do not treat testing as optional. A lot of sellers never test the whole path from purchase to edit. They only check the file in their own account, where everything already works. That does not tell you what a buyer sees. A fresh-account test is the fastest way to catch real problems before they reach a review.
What To Do Today If You Want To Launch Fast
If you want to move from reading to shipping, use this order: choose one template, clean the Canva file, build the Drive folder, write the PDF instructions, create three preview images, and then test the flow in a fresh browser session. Do not start by building five products at once. One solid delivery pack teaches you more than five rushed ones.
Once you finish the first pack, save the folder structure and instruction layout as a reusable template. That way the next product does not start at zero. You can duplicate the folder, swap the product name, swap the screenshots, and keep the same logic. That is how a beginner seller gets faster without making the experience sloppy.
If you are still deciding whether this niche is worth your time, the answer is simple: the product should solve a repeated problem and the packaging should make the solution obvious. Canva templates and Etsy digital products keep showing demand because buyers want something editable, useful, and fast to use. If you can package that clearly, you have a real chance at a shop that feels professional from day one.
Visual Walkthrough
Beginner Checklist
- Choose one template product and write the buyer promise in one sentence.
- Clean the master Canva file and rename the editable pieces clearly.
- Create one Google Drive folder with the PDF, link file, previews, and support note.
- Write the instruction PDF using the same labels the buyer will see in Canva and Drive.
- Create at least three preview images that teach the handoff, not just the look.
- Test the download path in a private browser window and on a phone.
- Fix any confusing step before publishing the Etsy listing.
Copy-Paste ChatGPT Prompt
Use this prompt to speed up your own delivery-pack setup:
Act as a beginner-friendly Etsy template operations assistant. I sell a Canva template called [PRODUCT NAME]. Write a simple delivery pack for a first-time buyer. Include: 1) a 1-page instruction PDF outline, 2) a Google Drive folder structure, 3) the exact steps the buyer should follow after purchase, 4) a short support note, 5) three listing image ideas that explain the handoff clearly, and 6) a short troubleshooting section for Canva template access. Use plain language, no jargon, and assume the buyer has never used a Canva template before.
Idea Tags
Continue Learning On IdeaVaultHQ
Use these guides to keep building the same shop system instead of stopping at one tutorial:
- IdeaVaultHQ home page
- How To Make Etsy Listing Images in Canva for Digital Products
- How To Use Canva Bulk Create to Make Etsy Listing Images Faster
- How To Write Etsy Listing Titles for Canva Templates in Google Sheets
- How To Build an Etsy Competitor Research Spreadsheet in Google Sheets for Digital Products
- Template Tutorials
- Canva Templates
- Sell On Etsy
- Digital Products
Current Sources Checked
- Etsy Seller Handbook: How To Sell Digital Downloads On Etsy
- Etsy Help: How To Download A Digital Item
- Etsy Help: How To Manage Your Digital Listings
- Etsy Seller Handbook: Keywords 101
- Canva Help: Share Your Design As A Template Link
- Canva Help: Share Designs With Your Team
- Canva Help: Set Up Brand Kits
- Canva Help: Create Designs In Bulk
- Google Drive Help: How To Use Google Drive On Computer
- Google Drive Help: Share Files From Google Drive
- Etsy market page: digital products best seller 2026
- Etsy market page: trending digital products Etsy
Continue Learning On IdeaVaultHQ
This guide is part of the IdeaVaultHQ Template School path. Use the links below to keep moving instead of stopping on one article.
Leave a Reply